I woke up Saturday morning, walked into my office, and was greeted by the sound of a grinding hard disk. Upon further investigation, the hard drive in question was an old 320GB Seagate hard drive that I use to store all of my OS files. The remainder of my files are stored on a RAID5. Normally I’d be upset about a hard drive that was about to fail, but this gave me an opportunity to replace my primary OS hard drive with a solid state drive. It worked out just fine, of course, but migrating the data from my old hard drive to my new hard drive was not as straightforward as you would expect it to be. My goal here is to document all of the steps you need to follow in order to migrate from a traditional hard drive to a smaller solid state drive.
The first thing I did was shut the computer down and let the hard drive cool down for a bit. I then booted it up with an Xubuntu 12.10 live CD and a 2TB hard drive I have for backup purposes. I mounted the 2TB drive and created an image of my hard drive by executing the following commands:
root@xubuntu:~# dd if=/dev/sdb of=/media/xubuntu/my_drive/hdd.img bs=32M

root@xubuntu:~# cp hdd.img hdd2.img
After that completed, I shut the system down, removed the bad drive, replaced it with a 180GB SSD, and booted back up with the Xubuntu 12.10 live CD again. Nothing out of the ordinary yet. You can mount the image as a loopback device if you like, but it won’t work with gparted:
root@xubuntu:~# losetup /dev/loop1 /media/xubuntu/my_drive/hdd.img
Since /dev/loop1p1 and /dev/loop1p2 don’t exist, gparted won’t work. It turns out there is a program called kpartx that solves this problem. Executing the following command will create entries in /dev/mapper for each partition on hdd.img:
root@xubuntu:~# kpartx -v /media/xubuntu/my_drive/hdd.img

root@xubuntu:~# ls -l /dev/mapper/loop1*

lrwxrwxrwx 1 root root 7 Jan  5 22:34 /dev/mapper/loop1p1 -> ../dm-0

lrwxrwxrwx 1 root root 7 Jan  5 22:34 /dev/mapper/loop1p2 -> ../dm-1
This is exactly what gparted needs, just in the wrong spot. This can be fixed by creating a couple of symlinks and restarting gparted:
root@xubuntu:/dev/mapper# ln -s /dev/dm-0 /dev/loop1p1

root@xubuntu:/dev/mapper# ln -s /dev/dm-1 /dev/loop1p2

root@xubuntu:~# gparted /dev/loop1
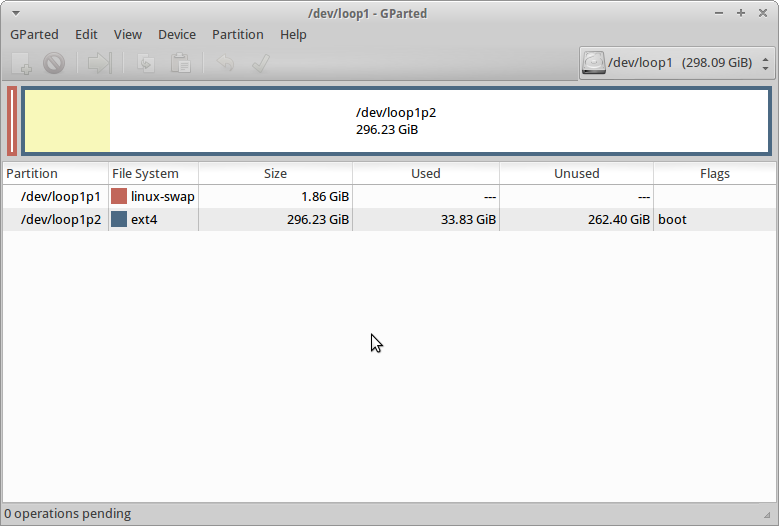
And now gparted works and we can shrink the partition:

If I wanted to, I could do the math and figure out how big the partition needed to be on the 180GB hard drive, but I didn’t feel like doing that. Instead, I just resized my ext4 partition down to ~100GB with the intent of expanding it once I copied it back to the SSD, which I did with this command (copying only the first ~120GB of the image, since I no longer need the remainder of the image):
root@xubuntu:~# dd if=/media/xubuntu/my_drive/hdd.img of=/dev/sdb bs=32M count=3840
Before I could make changes to /dev/sdb with gparted, I had to restart the system such that /dev/sdb1 and /dev/sdb2 were created. I then had to make 2 changes to the partition table on the SSD. First, I expanded the second partition to fill the disk. Next, I had to deal with alignment issues. A decent overview is provided here, but to summarize, solid state hard drives write data in large chunks. With the Intel SSD I just bought, it has a 512KB erase block size, meaning I want all of my partitions aligned on 512KB boundaries. Luckily, in my case, my partitions are already aligned on 512KB boundaries (even if it isn’t necessarily the most efficient use of space):
root@xubuntu:~# fdisk -l /dev/sdb
Disk /dev/sdb: 180.0 GB, 180045766656 bytes
255 heads, 63 sectors/track, 21889 cylinders, total 351651888 sectors
Units = sectors of 1 * 512 = 512 bytes
Sector size (logical/physical): 512 bytes / 512 bytes
I/O size (minimum/optimal): 512 bytes / 512 bytes
Disk identifier: 0x08b108b1
Device Boot Start End Blocks Id System
/dev/sdb1 2048 3905535 1951744 82 Linux swap / Solaris
/dev/sdb2 * 3905536 220096511 108095488 83 Linux
Normally, that would be sufficient, but when I restarted I ran into GRUB issues, which I still don’t fully understand. I booted up my system, and GRUB gave me an “invalid extent” error, which apparently happens if you try to boot to a really big drive. After further investigation, this seemed to be because the SSD was now being reported as hd1 whereas GRUB expected it to be hd0. All the drives were plugged into the same SATA ports, and the BIOS was reporting the drives in the original order, so I’m not sure how this happened. I eventually installed GRUB on the MBR of every hard drive in my system (including all the drives in my RAID5), not just the SSD, which resolved the issue. The best explanation I can come up with so far is that my system started loading the MBR off of one of the disks in my RAID array for some reason (instead of off of the SSD). Since I never installed GRUB to the MBR of each disk in my RAID array, the MBR consisted of whatever used to be in it, which included old installations of GRUB that were installed with entirely different hard disk configurations. Since this relic installation of GRUB was loaded, it was trying to find the GRUB configuration on a 1.5TB disk with a bunch of RAID5 data on it, and that obviously didn’t work, so I got the extent error. While that’s kind of tangential to the original intent of this blog post, I couldn’t find that explanation anywhere online, so perhaps it might help someone if they run into the same issue.
 Blog
Blog